
Rotate images
This is how you can rotate the image.
#Auto rotate based on EXIF
Some smartphones uses EXIF-information to let applications know how the image is rotated. This is in general handled by image processing tools. But if you, for example, take a image with your iPhone and email the image to yourself and then adds it to your website, then it will not adhere to the EXIF-information.
Let us see how it works.
You need the EXIF extension to support auto-rotation of JPEG-images.
| Usage | |
|---|---|
Image taken with iPhone.&w=300 |
 |
Same image but auto rotated using EXIF.&w=300&aro |
 |
#Rotate based on angle
If you need to rotate the image, you do so by adding the angle to rotate. This is how you use the same source image as above, and rotate it “by hand” to make it look okey.
| Usage | |
|---|---|
Image from iPhoto, rotated -90°.&w=200&r=-90 |
 |
Image from iPhoto, rotated 0°.&w=200&r=0 |
 |
Image from iPhoto, rotated 90°.&w=200&r=90 |
 |
Image from iPhoto, rotated 180°.&w=200&r=180 |
 |
Image from iPhoto, rotated 270°.&w=200&r=270 |
 |
#Rotate before or after processing?
Hmmm, in the example above, you got two different results on the resulting image dimension. Why? Well, aro, auto-rotate rotates the source image before its resized and r, rotate rotates the image after its resized.
The difference can be spelled out as this.
- Before. Take the image, rotate it, then give it its final dimensions which makes some sense with respect to the width and height you are expecting.
- After. Take the image, resize it and then rotate the image. The target size you expect is there, but inverted - you get a portrait image and turn it to a landscape image and width and height are swapped.
| Rotate before or after resizing | |
|---|---|
Rotate before, final dimension as expected (same as auto-rotate).&w=100&h=200&rb=-90 |
Rotate after, expected dimensions are inverted, width becomes height and height becomes width.&w=100&h=200&ra=-90 |
 |
 |
So, normally this makes sense, but if you get in trouble, remember that rotate before, or after, processing and resizing, gives different results.
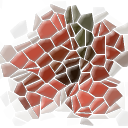
#Rotate non perpendicular angle
If you rotate the image in a non perpendicular angle you need to fill the background with a color. You control what color to use with bgc, bg-color.
| Rotate and fill remaining space | |
|---|---|
Use auto rotation to get it right in the first place.&w=100&aro |
 |
Rotate 15 degrees, before processing. Resulting image keeps its dimensions,&w=100&aro&rb=15 |
 |
Rotate 15 degrees, after processing. Resulting image gets unknown dimensions.&w=100&aro&ra=15 |
 |
Rotate 15 degrees, after processing. Use bgc, bg-color to select the background color.&w=100&aro&ra=15&bgc=cccccc |
 |
Rotate 15 degrees, after processing. Combine with a, area to get only a part of the image and height together with crop-to-fit to make it all fit in a box of 100x100px.&w=100&aro&ra=15&a=20,30,40,20 |
 |